2017年4月29日 星期六

opencv on swift

Ref : https://www.youtube.com/watch?v=ywUBHqxwM5Q

Ref : https://github.com/foundry/OpenCVSwiftStitch


先到 opencv.org 去download opencv 的framework

http://opencv.org/opencv-3-2.html


copy  到  project


新增一個 Coco touch class  ->  OpenCVWrapper ->  object-c type


同時也產生  Bridging-Header.h file

在 Bridging-Header.h 加入

#import "OpenCVWrapper.h"


-------------------------------------


在  Oㄣ

OpenCVWrapper.h 

加入 +(NSString *) openCVVersionString;  這個  function header

然後在 OpenCVWrapper.mm (把.m 改成 .mm)

+(NSString *) openCVVersionString{
    
    return [NSString stringWithFormat:@"OpenCV Version %s",CV_VERSION];
}


接下來就可以在swift 裡面去呼叫了


在  viewcontroller.swift 
 print(OpenCVWrapper.openCVVersionString())


2017年4月11日 星期二

ios ocr 辨識

Ref : https://www.youtube.com/watch?v=DTQ1z_8KXZo

Ref : https://github.com/tesseract-ocr

Ref : http://stackoverflow.com/questions/42742853/swift-3-how-do-i-improve-image-quality-for-tesseract

speech recognization


 func recognizeSpeech(){
        SFSpeechRecognizer.requestAuthorization { (authStatus) in
    
            if authStatus == SFSpeechRecognizerAuthorizationStatus.authorized{
            
            if let path = Bundle.main.url(forResource: "audio3", withExtension: "mp3"){
                let recognizer = SFSpeechRecognizer()
                let request = SFSpeechURLRecognitionRequest(url: path)
                recognizer?.recognitionTask(with: request , resultHandler: {
                  (result , error) in
                    if let error = error {
                        print("something went wrong\(error)")
                    }else{
                        self.textview.text = String(describing: result?.bestTranscription.formattedString)
                    }
                
                })
            }
            }
        }
        

    }

link speech frame work in ios


1.  go to Build Phase Tag  ->    Link Binary with Library ->  按下 + 號

選擇   Speech framework  


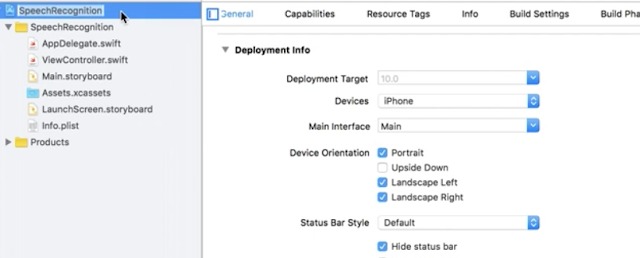
Hide status bar in Xcode


1.
info.plist 要新增一個控制  ->  view controller-based status bar ...  -> NO

2.   general ->    Hide status bar 勾選起來

2017年4月8日 星期六

two table view in viewcontroller

Ref : https://github.com/huynhbahieu/Swift_...


class ViewController: UIViewController,UITableViewDelegate, UITableViewDataSource {
let numberRowOfTableView_1 = 4
let numberRowOfTableView_2 = 5
@IBOutlet weak var tableView_1: UITableView!
@IBOutlet weak var tableView_2: UITableView!
override func viewDidLoad() {
super.viewDidLoad()
// Do any additional setup after loading the view, typically from a nib.
self.tableView_1.delegate = self
self.tableView_1.dataSource = self
self.tableView_2.delegate = self
self.tableView_2.dataSource = self
}
override func didReceiveMemoryWarning() {
super.didReceiveMemoryWarning()
// Dispose of any resources that can be recreated.
}
func tableView(tableView: UITableView, numberOfRowsInSection section: Int) -> Int {
return (tableView == self.tableView_1) ? self.numberRowOfTableView_1 : self.numberRowOfTableView_2
}
func tableView(tableView: UITableView, cellForRowAtIndexPath indexPath: NSIndexPath) -> UITableViewCell {
if(tableView == self.tableView_1){
var cell: classTableView_1 = tableView.dequeueReusableCellWithIdentifier("cellTableView_1") as! classTableView_1
cell.label_text.text = "Table View 1, row: \(indexPath.row)"
return cell
}else{
var cell: classTableView_2 = tableView.dequeueReusableCellWithIdentifier("cellTableView_2") as! classTableView_2
cell.label_text.text = "Table View 1, row: \(indexPath.row)"
return cell
}
}
}

ios 上架教學

Ref : http://www.appcoda.com.tw/ios-app-submission/